Pink and girlie flower power!

Pink and girlie flower power!

Hi!
I’m still very behind with my blogging- I’ve been crafting but not necessarily getting cards done.
This is a girlie birthday card I’ve made. It needed to be posted so had to be quite flat.

I used a LOTV die cut as I was in a rush! I coloured the background using distress ink and also used it to edge the card.
The beautiful background paper was from stash and meant I could keep my embellies simple- ribbons, a flower from stash and  gem flower and butterflies coloured with my Promarker.
I was in such a rush to post this that I only took one photo and forgot to show the matching decoration inside!

I would like to enter this card to the following challenges 
Lili’s Little FairiesOh so girlie
Craft Punked – Flower Power 
In the Pink-50 shades of pink
Pause, Dream, Enjoy– Flamingos or Pink
Dilly Beans – Bright Colours

Proud as a peacock.

Proud as a peacock.

I absolutely love the colours of peacock feathers and while on holidays I had a chance to take some photos of some. I’m going to build up a digikit and to start I made this congratulations card for the things with wings and bird challenges (see end of post).
I inked the edges of the card with distress ink. I made the backing paper using a close up photograph of the peacock back feathers- they have a beautiful scallop shape. Hopefully there is enough glitz and glamour for the paper shelter challenge.
I adapted a swirl cutting file from Linda (many thanks!) to fit a square card and then added an oval in the middle of the page (I always love a good old flourish and swirl challenge!). As ever my Cougar has cut it my textured card brilliantly- I’m loving to have enough time to play properly.

In the middle I cut an oval on a slightly different shade of card and out it on with foam pads. I altered my peacock photograph to give it an artistic brush effect and I printed and then cut it on the Cougar. I layered it up further by making two more peacock feather papers to use with my sentiment.

A close up to show the cut an texture of the card.

I made the inside paper using Craft artist- I kept it to one layer so it is a flatter card but used the elements from the front to keep it consistent.

I would like to enter the following challenges
A & T Emerald Faeries Challenge – Flourishes & Swirls
Paper Shelter Challenge – Glitz and Glimmer
Paper Play – Layer It Up !
Clearly Inspired – Things with Wings
Can You Digi It – Bird Is The Word 
Craftymess–Birds
Great ImpressionsAnything with Animals

Anniversary card

Anniversary card

I’m finally having time to really get to know my Cougar cutter at the moment. Thanks to everyone over on the forum for their help- in particular big thanks to Gerti and Linda.

This is an anniversary card- hopefully not too girly!!
The back layer is a paper from Craft Artist coloured purple. I then cut the frame using textured card with my Cougar and blended Dusty concord distress ink over it. I used a sponge dauber to get more intense colour for the circle in the middle of the frame. I then cut a scalloped square with the Cougar and blended milled lavender around the edges and attached with foam pads.

 I then used a LOTV die cut on foam pads. I sponged milled lavender around the background and added Perfect Pearls. I then added some Spray and Shine.You get a lovely shimmer at certain angles but it is difficult to capture in the photo.

I made the paper inside using Craft Artist- I added the cutting files over the backing paper and recoloured them to match. This means the inside matches but it is flat and doesn’t use so much paper!!

I would like to enter the following challenges
Inky impressions- use dies or punches
Pennys challenges- weddings or anniversaries
Samuel taylors- use die cuts
Fab’n’funky challenges- no stamped images

Angelic Christmas in July!

Angelic Christmas in July!

I guess I ought to get started on the odd Christmas card. I’m feeling a bit under the weather so I made this quickly using scraps left from Christmas and an LOTV die cut. I kept it quite simple and flat to help with postage.
Iused some glimmer mist on the doily.

It’s not Christmas without some stickles on the image!

The inside is matching but quite plain.

I would like to enter my card for the following challenges
Paper play challenges- Christmas in July
Delightful challenges- Christmas in July
Platypus creek digitals- things with wings
Samuel taylors- die cuts (I hope a bought one is ok!)
Die cuttin diva- die cuts (again I hope a bought one is ok)

Menu planning board

Menu planning board

I wanted to make a lovely menu planning board to inspire me to get back on track with menu planning. I only menu plan for main meals. I didn’t want to spend any money so this is all from stash. I made the backing paper with Craft Artist and stuck it onto foam board. I put a bulldog clip at the top so I could hang it on the wall.

I stuck a small hook for each day along the top.

I made small holders from card at the bottom for my main categories of meals- poultry, meat, fish, other and side dishes. I have small cards in each holder (colour coded!). I will write the meals we like on these cards. When we menu plan for the week I can make sure I have a balance of the categories.

Once chose I can hang the cards up so we know what we’re doing!

Hopefully tomorrow I’ll share the next stage of my menu planning plans, as with all the best plans there will be some crafting involved 😉

No shrinking violet!

No shrinking violet!

Going for a Summery feel with this card with some nice bright colours to cheer the day up. I made the digital papers using Craft Artist.

The digi is another beauty from Saturated Canary coloured with Promarkers and Flexmarkers.

I made matching paper for the inside.

 I would like to enter the following challenges
Daisy doodles creative challenges- Here Comes The Sun!
Bearly mine challenges- girly birthday card
Divas by design- anything goes

Spending wallet

Spending wallet

In my quest to live more simply I want to focus on cutting down my spending. I find it really difficult to keep a spending diary so I thought that if I made myself a beautiful way of tracking spending I might keep to it!!
This is the way I came up with! The papers I used for the project are First Edition- Hideaway.
I took two double sided 8×8 papers. I joined them by cutting a small piece of 8×8 paper, scoring it in the middle and taping it to the papers.

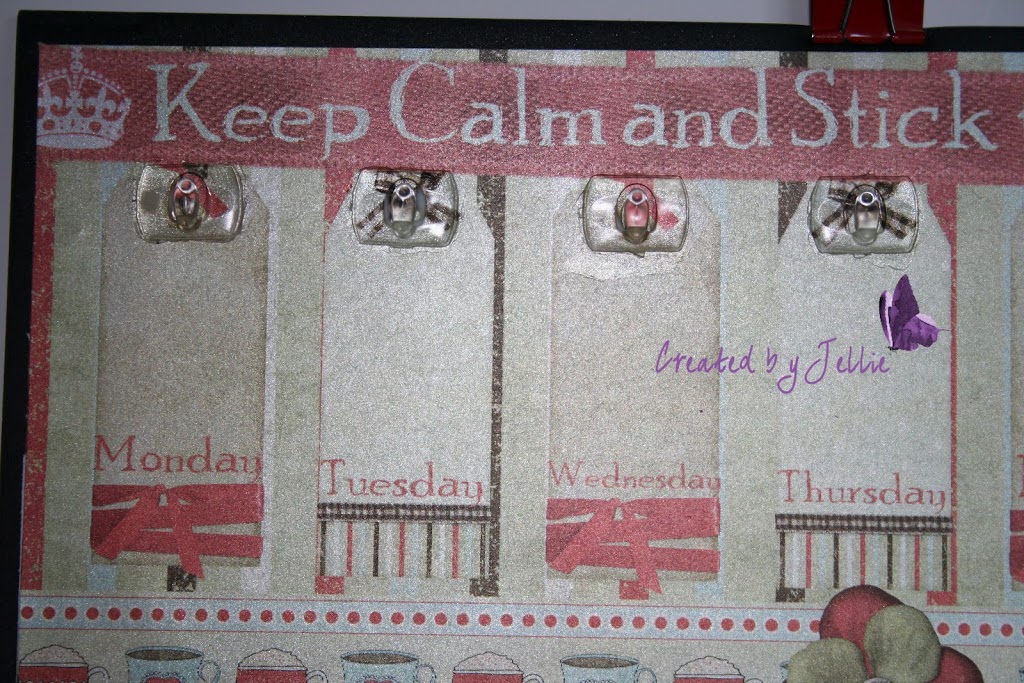
I then scored half way across each page and about 1/3 from the bottom. I folded the bottom section up to make a pocket and cut a slanted edge to each section.

The outside was made from an 8×8 card scored in half and then a small section of card taped to the end and also scored.

I sponged pearlescent green ink around  the inside of the card. I taped the paged inside.

I made tags using scrap paper. I will use scrap paper to do this every month. I am going to record spending on these tags. I’ll keep a record of no spend days, essentials,
luxuries and money spent on hobbies. I use the no spend days challenge on Money Saving Expert as an incentive not to go near the shops unless I really need to!! I thought by recording essentials versus luxuries it will help me to think about what spending is related to wants and what is related to needs. Ideally I want to minimise wants and put that money towards the mortgage.

When closed I will secure the wallet with a ribbon. I used Soft Green Promarker to colour the ribbon so it would match.

At the end of each week I’ll record the spends in a spreadsheet and at the end of the month I will put the tags together with a ribbon. I’ve made a folder to keep the tags in and will also keep receipts in there.
I took a piece of green card and scored every cm and folded it like an accorian. I then put tape all along it and taped 12 envelopes in to it. (I always have tons of envelopes as I bought lots of card blanks with envelopes and then I make the cards too big to fit the envelopes!!) I alternated yellow and green envelopes.

This is the finished accordian of envelopes.

I scored a piece of green card for the cover and cut papers to stick on to the outside

and to the inside

I then used tape and book binding glue to attach the accordian envelopes to the cover.

I used magnetic tape to hold the cover closed and added a flower embellishment. I wanted to keep it simple as the papers are quite glitzy!

I used spray varnish on both projects to give tham lovely shine and a little added protection.
Hopefully with the lovely wallet and folder I will keep better track of my spending so I can analyse it and see where I can cut costs. It should also help me to think carefully about the things I want versus the things I need when I shop.

Happy memories as we look forward to Summer Holidays

Happy memories as we look forward to Summer Holidays

I’m finally getting round to blogging some of my makes from the last few months. Making cards for several of my classes plud making these gifts for my form took me a lot of time and it was pretty intense but it was really lovely to give them personalised things as they are great pupils and I’ve loved teaching and tutoring them. So these are for their Summer Holidays!

I got hold of a couple of photos of the form (I’ve blurred all the information for privacy reasons!).
I created the background for the photo using Craft Artist. I cut acetate to sit in front of the picture as the frames did not have any glass.
I took some plain wood frames and painted them with black or red pearlescent paint. I used a circles stamp with silver ink and then heat embossed with silver.

I found these cute rulers on sale in January so I glued them to the front of the frames for the lads.

 The red pearlescent ink actually has a pink sheen at a certain angle!

For the frames for girls I made paper flowers using punches and added red buttons.

I would like to enter these for the following challenges

Delicious doodles challenge- Summer Holiday theme
Joanna Sheen Challenge- going round in circles
Paper Pretties- embossing

I’ve been a naughty blogger!!

Hi!
I’ve been such a naughty blogger! I got a bit crafted out and frazzled doing all my end of term makes so I had a bit of a break. I have made a few pictures but I can’t post them as they were personal to the recipients.
At the moment I’m playing with making a book and I’ve been trying out lots of techniques to make  backgrounds etc. I will try and catch up with posting makes and reading everyones blogs as soon as I can!
Happy crafting to all!! x

May the force be with you

May the force be with you

I’ve been very busy making lots of good luck cards. This is the first batch! I decided to go for simple monochrome. I used a Krista Smith digi in blue and made the papers with Craft artist. I used punches to make the card asymetric and for added decoration.
Here is one blue card in detail. Stereotypically the blue is for the boys!!

 This is the inside

These are the rest of the blue batch!

An example of a pink girly one!

The inside

And the rest of the pink batch

I’ve put this on the back!

I’d like to enter the following challenges

Flourishes –  pink-a-licious
Divas by Design – for boys
Paper Take Weekly – Cute Cute Cute
Crafts and Me – punches and diecuts
Stampin’ Royalty – punches
Scrapbook Sisters  off-center